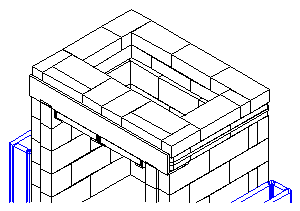
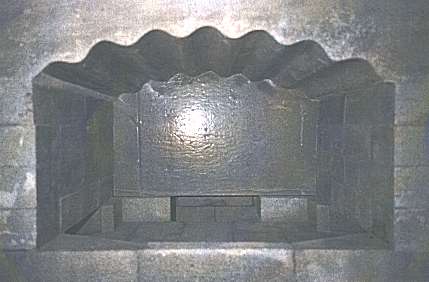
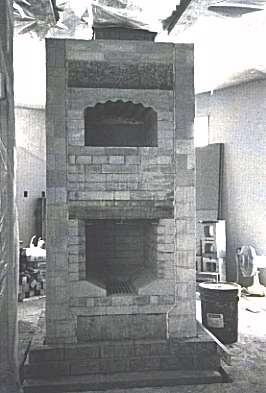
 Figure 1
 by Marcus Flynn, Pyromasse
I first became aware of white upper chamber bakeovens
about two years ago, but, not having access to the necessary technical
information, never offered it as an option to my clients. Also contributing
to my apathy towards white ovens was my belief that their only advantage
over the standard black ovens was that the bake chamber remained clean.
My clients would never inquire about the white oven option and I would
even as a general rule try to disuade them from opting for the black oven
on the grounds that it was primarily a novelty feature which most clients
seemed to abandon using once their initial enthusiasm had worn off. I have
nevertheless built several "black" upper chamber ovens.
Figure 1
Last season I received a couple of inquiries from prospective clients
who had first been in touch with my principal competitor, who I knew built
only white ovens. It seemed that at least in terms of bakeoven technology,
some of my clients were better educated than myself.
Eventually the situation arose where a client said " OK, you've
got the job as long as you build me a white oven." Knowing that the
white oven my competitor used had been developed by Norbert Senf in Shawville,
Quebec, I contacted Norbert and asked if he would be willing to offer any
information regarding the white oven layout, etc. I was promptly faxed
a set of working drawings and together with some over the telephone backup
just before starting, built my first heater with the white oven option.
My construction experience was as follows:
After building a standard firebox I began corbelling straight off the
angle iron lintel over the firebox opening, using the bond indicated in
Norbert's plan (Figure 1, Figure 2). The lower end corners of the bricks,
corbelling up to form the firebox ceiling, were not cut back at an angle
as is standard. This gave a "stepped" rather than a smooth angled
firebox ceiling. I was initially concerned about the potential drag that
this stepped firebox ceiling might produce. After firing the heater, however,
it became evident that any drag or confluence was negligible. The stepped
ceiling may even be of benefit in that it promotes mixing of the smoke,
flame and secondary air as it rushes up towards the throat. The corbelling
was stopped approximately 7 ˝" from the rear wall of the firebox which
had been laid straight up (ie., no corbelling off the rear wall).
Figure 2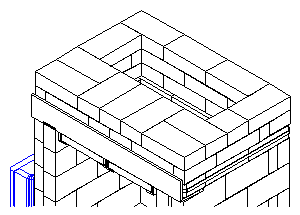
The next course (Figure 3) formed the portion of the smoke path beneath
the oven hearth slab. This course has one slot or opening of approximately
3" at the rear of each side of the core. These slots allow the gases
which flow under the oven hearth slab to exit into the side channels. The
two bricks forming the front course were cut back, allowing the smoke path
to extend as far forward under the hearth slab as possible.
Figure 3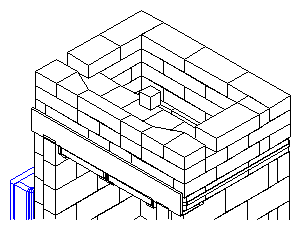
The oven's side walls were then laid up four courses high and a conventional
vaulted oven ceiling cast in place. A 1/8" gasket board was used to
prevent bonding of the cast vault to the upper surfaces of the bricks forming
the side walls.
At this point a slab was cast (separately, on the floor) 3" thick
by 27" wide ( width of core) and just slightly higher than the highest
point of the extradus at the rear end of the cast oven vault. This slab
would form the rear wall of the oven chamber. It also bridges the throat,
deflecting approximately 25% of the gases under the hearth slab.
The hearth slab was also cast at this time (also separately on the floor).
Nobert had said that precautions against leakage had to be taken with white
ovens, so I set out to make the bake chamber as tight and well gasketed
as possible. For this reason the hearth slab was cast exactly to the square
of the oven's side and rear walls (less 1/8" all round to allow space
for gasketing). Here an angle finder was used to account for any possible
variation of square between the rear and side walls. As the rear wall slab
had just been cast a piece of wood was temporarily inserted in its place
for measuring purposes. The molds for the two slabs were neatly lined with
clean plastic. The bottom surface of the slabs, ie that which was cast
against the plastic on the bottom of the molds, would be the surface visible
inside the oven chamber. This gave a smooth shiny easily cleanable surface
texture on the hearth and rear wall.
Figure 4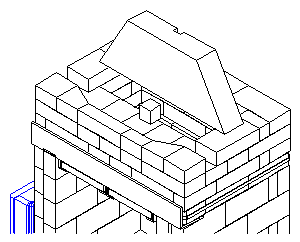
Once cured, the slab for the oven rear wall was set in place dry (Figure
4), and the line of the extrados of the cast arch marked off against it.
After being taken outside, the slab was cut down with a grinder to the
line marked. The top rear edge of this slab was ground round to improve
smoke flow over the oven vault.
The slab then had a 1/8" role board gasket inserted between it
and the rear surface of the side walls and the rear edge of the vault.
The rear face of the slab was then gasketed where the side walls of the
core would push up against it. The rear wall of the core was then laid
up along with the side walls which are at this point only as long as the
throat is wide. These were laid up to the capping slab level. The two short
portions of the side walls brace the rear slab tightly against the rear
faces of the vault and side walls. Bringing the side walls of the core
up to capping slab height ensures that the gases flow over the vault before
entering the side channels rather than pouring straight over the side of
the throat into the channels and bypassing the vault.
For the portion of the front wall of the core above the oven vault,
a precast refractory lintel was used rather than bricks, in an attempt
to relieve some of the pressure of the core's front wall (the portion above
the vault) from the middle of the vault.
The last step was the insert the hearth plate. The side and rear inside
surfaces of the the bake chamber were lined with 1/8" role board gasket
up to the thickness of the hearth slab (about 2 ˝"). The gasket was
glued in place with the smooth side side outside, to reduce its tendency
to tear as the hearth slab was slid in. Before the hearth slab was slid
in, about 1/64" was ground off its lead conrners and its edges checked
for lumps, etc. The slab was then carefully slid into place, paying attention
not to scuff or tear the gasket and thus destroy the seal.
One thing concerning me before starting the job was the extra time it
would take. I found though that the extra time needed to build the white
oven against the simpler black oven was made up for by the simplicity of
the bond for the firebox ceiling corbelling, and the fact that I didn't
have to make angle cuts on the ceiling bricks as I had always done.
Besides the inside of the white oven not becoming coated with carbon deposits and fly ash, it does have other considerable advantages over its black counterpart:
After an appropriate number of curing fires, the heater was brought
up to temperature with two large fires. The hearth and rear wall of the
oven became too hot to touch even momentarily without getting burnt. Since
it is now the end of April, I will have to wait until the next heating
season for a full assesment of the heater's performance.
Potentially worrying observations were:
This season I am enthusiastically offering the white oven as a low cost,
practical option! Comments and feedback are welcome.
Pyro Masse, Montréal, April 1996. (Marcus Flynn)